Secure and explore ASP.NET Core Web APIs
How to create a ASP.NET Core Web API, secure it with JSON Web Tokens and explore it with Swagger UI and Postman.
You can view the example code in this post at https://github.com/hlaueriksson/ConductOfCode
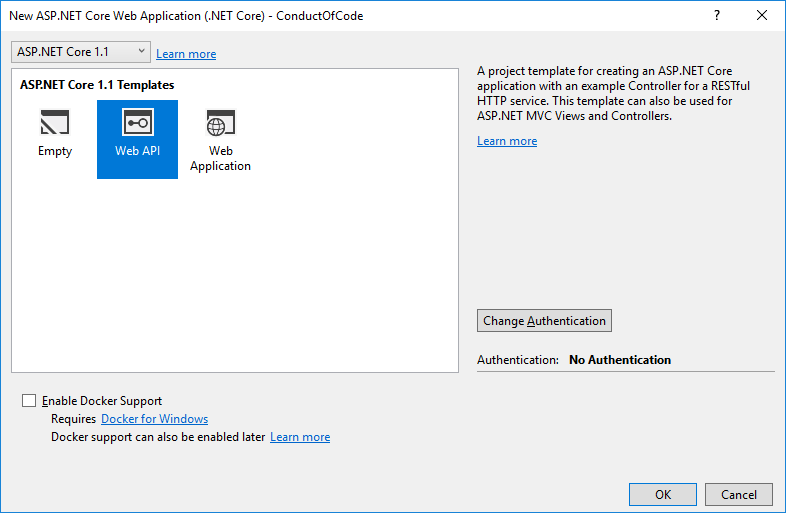
ASP.NET Core Web API
I installed the new Visual Studio 2017 and created a new ASP.NET Core Web Application.
Then I added these dependencies:
- Swagger with Swashbuckle.AspNetCore
- JSON Web Tokens (JWT) with Microsoft.AspNetCore.Authentication.JwtBearer
The subject in this blog post is the StackController:
-
The controller provides a REST interface for an in-memory stack. It’s the same example code I have used in a previous blog post.
-
The
[Authorize]attribute specifies that the actions in the controller requires authorization. It will be handled with JSON Web Tokens. The configuration for this will be done in theStartupclass. -
The actions are decorated with
SwaggerResponseattributes. This makes Swashbuckle understand the types returned for different status codes.
The appsettings.json file has some custom configuration for the JWT authentication:
-
In this example we will use three things when issuing tokens;
Audience,Issuerand theSigningKey -
The values for
AudienceandIssuercan be an arbitrary string. They will be used as claims and the tokens that are issued will contain them. -
The
SigningKeyis used when generating the hashed signature for the token. The key must be kept secret. You probably want to use the Secret Manager to secure the key.
The TokenOptions class is the type safe representation of the configuration in the appsettings:
-
The
Typedefaults toBearer, which is the schema used by JWT. -
The expiration of the tokens defaults to one hour.
The TokenOptions will be used in two places in the codebase. Therefor I extracted some convenience methods into TokenOptionsExtensions:
-
GetExpirationreturns aDateTime(UTC) indicating when the issued token should expire. -
GetSigningCredentialsreturns an object that will be used for generating the token signature.HmacSha256is the algorithm used. -
GetSymmetricSecurityKeyreturns an object that wraps the value of theSigningKeyas a byte array.
The
Startupclass configures the request pipeline that handles all requests made to the application.
Swagger, SwaggerUI and JwtBearerAuthentication is configured here:
ConfigureServices:
-
The
AddOptionsmethod adds services required for using options. -
The
Configure<TokenOptions>method registers a configuration instance whichTokenOptionswill bind against. TheTokenOptionsfromappsettings.jsonwill be accessible and available for dependency injection. -
The
AddSwaggerGenmethod registers the Swagger generator.
Configure:
-
The
UseSwaggermethod exposes the generated Swagger as JSON endpoint. It will be available under the route/swagger/v1/swagger.json. -
The
UseSwaggerUImethod exposes Swagger UI, the auto-generated interactive documentation. It will be available under the route/swagger. -
The
InjectOnCompleteJavaScriptmethod injects JavaScript to invoke when the Swagger UI has successfully loaded. I will get back to this later. -
The
UseStaticFilesmethod enables static file serving. The injected JavaScript for the Swagger UI is served from thewwwrootfolder. -
The
UseJwtBearerAuthenticationmethod adds JWT bearer token middleware to the web application pipeline.AudienceandIssuerwill be used to validate the tokens. TheSigningKeyfor token signatures is specified here. The authorization to theStackControllerwill now be handled with JWT.
Read more about Swashbuckle/Swagger here: https://github.com/domaindrivendev/Swashbuckle.AspNetCore
To issue tokens, let’s introduce the AuthenticationController:
-
An
IOptions<TokenOptions>object is injected to the constructor. The configuration is used when tokens are issues. -
The
JwtSecurityTokenclass is used to represent a JSON Web Token. -
The
JwtSecurityTokenHandlerclass writes a JWT as a JSON Compact serialized format string. -
Actual authentication is out of the scope of this blog post. You may want to look at IdentityServer4.
-
You probably want to require SSL/HTTPS for the API.
The response from the Token action looks like this:
{
  "token_type": "Bearer",
  "access_token": "eyJhbGciOiJIUzI1NiIsInR5cCI6IkpXVCJ9.eyJleHAiOjE0OTA5ODkyNzUsImlzcyI6IkNvbmR1Y3RPZkNvZGUiLCJhdWQiOiJodHRwOi8vbG9jYWxob3N0OjUwNDgwIn0.iSP0Go20rzg69yxERldCCl4MRpCfC1JwcJTstkcc_Ss",
  "expires_in": 3600
}Audience, Issuer and Expiration are included in the JWT payload:
{
  "exp": 1490989275,
  "iss": "ConductOfCode",
  "aud": "http://localhost:50480"
}
If you copy the value of the access_token, you can use https://jwt.io to view the decoded content of the JWT:

When accessing the StackController, a JWT should be sent in the HTTP Authorization header:
Authorization: Bearer eyJhbGciOiJIUzI1NiIsInR5cCI6IkpXVCJ9.eyJleHAiOjE0OTA5ODkyNzUsImlzcyI6IkNvbmR1Y3RPZkNvZGUiLCJhdWQiOiJodHRwOi8vbG9jYWxob3N0OjUwNDgwIn0.iSP0Go20rzg69yxERldCCl4MRpCfC1JwcJTstkcc_SsRead more about JWT here: https://jwt.io/introduction/
The request and response classes:
Swagger UI
We can explore the API and the StackController with Swagger UI.
The Swagger UI in this example is available at http://localhost:50480/swagger/
The Swagger specification file looks like this: swagger.json
Because the API is using JwtBearerAuthentication, we will now get a 401 Unauthorized if we don’t provide the correct HTTP Authorization header.
To fix this we can inject some JavaScript to Swagger UI with Swashbuckle. I was reading Customize Authentication Header in SwaggerUI using Swashbuckle by Steve Michelotti before I was able to do this myself.
There are two approaches and two scripts located in the wwwroot folder of the project:
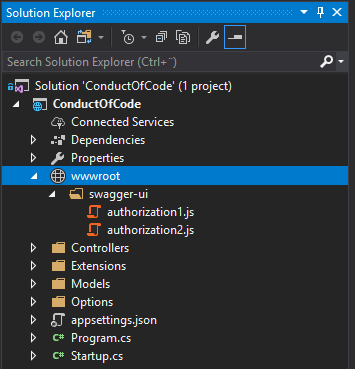
authorization1.js
-
JQuery is used to post to the
AuthenticationControllerand get a valid JWT -
When the response is returned, the
access_tokenis added to the authorization header -
The
StackControlleractions should now return responses with status codes200
Inject the script to Swagger UI in Startup.cs:
app.UseSwaggerUI(c =>
{
    c.SwaggerEndpoint("/swagger/v1/swagger.json", "ConductOfCode");
    c.InjectOnCompleteJavaScript("/swagger-ui/authorization1.js");
});
The result looks like this:

-
Enter a username and password, click the Get token button to set the authorization header
-
The Get token button only needs to be clicked once per page load
authorization2.js
-
CryptoJS is used to generate a valid JWT
- The JWT payload and the
SigningKeymust be known
- The JWT payload and the
-
The generated token is added to the authorization header
-
The
StackControlleractions should now return responses with status codes200
Inject the scripts to Swagger UI in Startup.cs:
app.UseSwaggerUI(c =>
{
    c.SwaggerEndpoint("/swagger/v1/swagger.json", "ConductOfCode");
    c.InjectOnCompleteJavaScript("https://cdnjs.cloudflare.com/ajax/libs/crypto-js/3.1.9-1/crypto-js.min.js"); // https://cdnjs.com/libraries/crypto-js
    c.InjectOnCompleteJavaScript("/swagger-ui/authorization2.js");
});- The
crypto-jsscript is injected from a CDN.
The result looks like this:

- Enter audience, issuer, and signing key. A token is generated and the authorization header is set every time the Try it out! button for an action is clicked.
Postman
We can explore the API and the StackController with Postman.
Download: https://www.getpostman.com
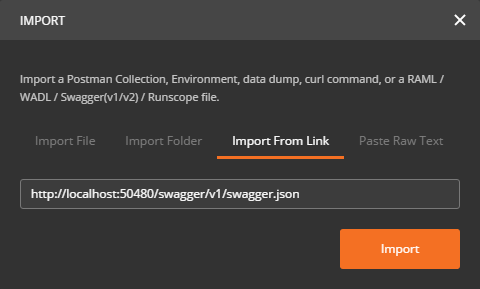
Import the Swagger specification file:
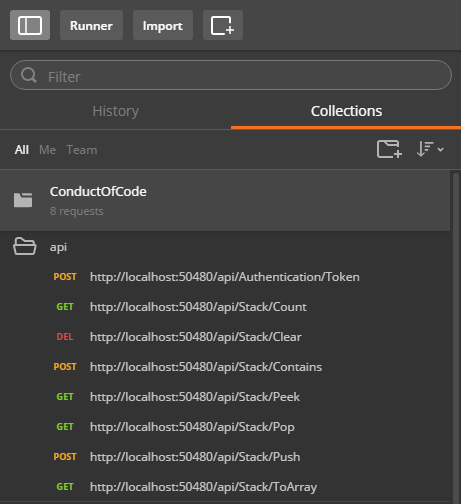
Then the API is available in a collection:
Because the API is using JwtBearerAuthentication, we will now get a 401 Unauthorized if we don’t provide the correct HTTP Authorization header.
There are two approaches to fix this.
Tests
The Token action in the AuthenticationController issues tokens.
Add some JavaScript in the Tests tab:
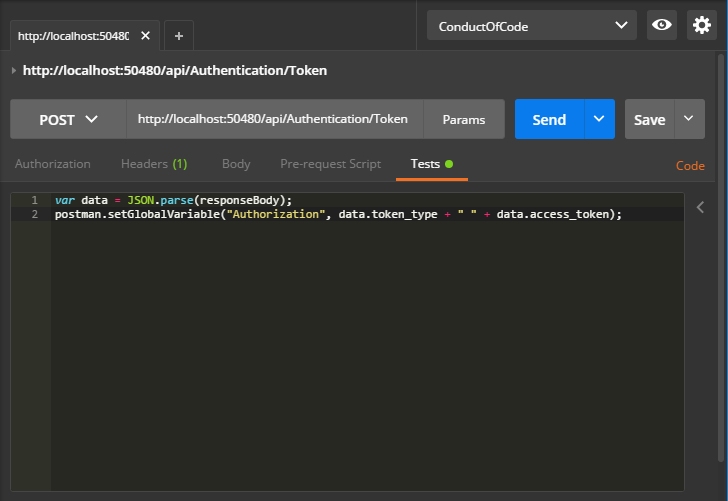
var data = JSON.parse(responseBody);
postman.setGlobalVariable("Authorization", data.token_type + " " + data.access_token);-
When the response is returned, the access_token is stored in the global variable
Authorization -
The request to the
Tokenaction only needs to be sent once per token lifetime (one hour)
Add Authorization to all actions in the Headers tab:
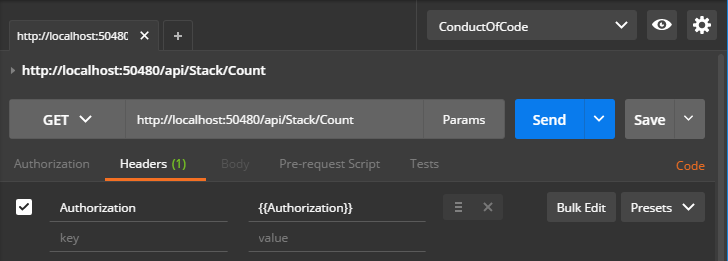
Authorization:{{Authorization}}- The token is accessed via the global variable
{{Authorization}}
The StackController actions should now return responses with status codes 200.
Pre-request Script
We can add some JavaScript to Postman that generates a valid JWT. I was reading JWT Authentication in Postman before I was able to do this myself.
-
CryptoJS is used to generate a valid JWT
- The JWT payload and the
SigningKeymust be known
- The JWT payload and the
-
The generated token is stored in the global variable
Authorization
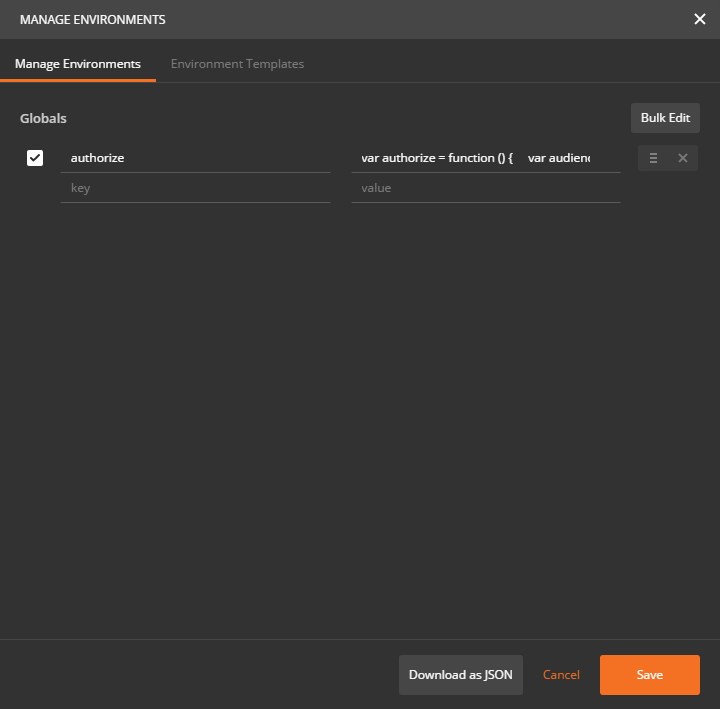
Add the content of the authorization3.js file to global variable authorize:
Create an environment and add variables:
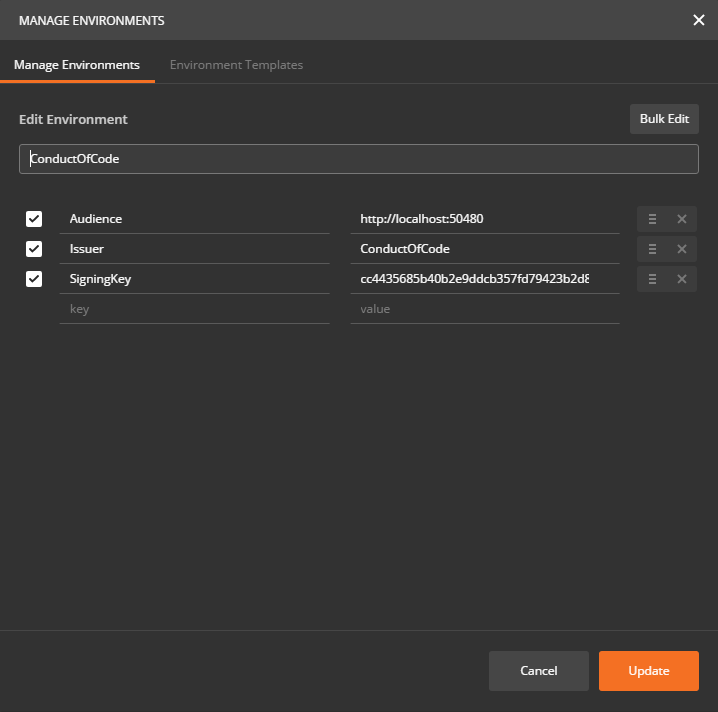
Audience:http://localhost:50480Issuer:ConductOfCodeSigningKey:cc4435685b40b2e9ddcb357fd79423b2d8e293b897d86f5336cb61c5fd31c9a3
Add JavaScript to all actions in the Pre-request Script tab:
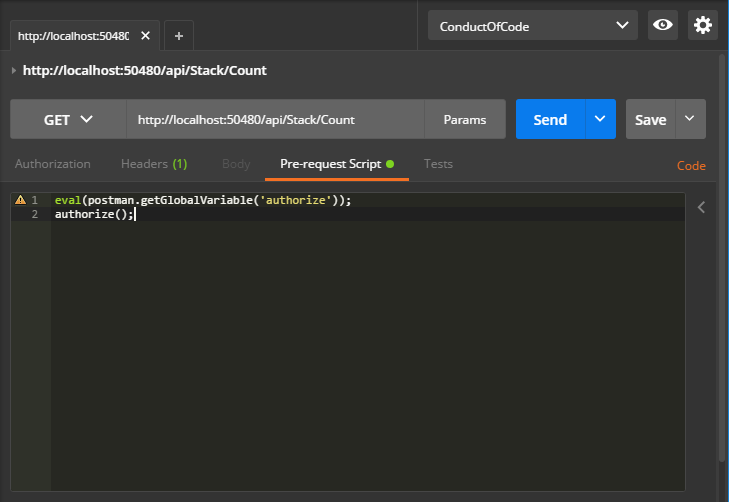
eval(postman.getGlobalVariable('authorize'));
authorize();-
The JavaScript is accessed from the global variable
authorizeand evaluated. -
The function
authorizeis executed and the token is generated.
The StackController actions should now return responses with status codes 200.
The collection can be exported:
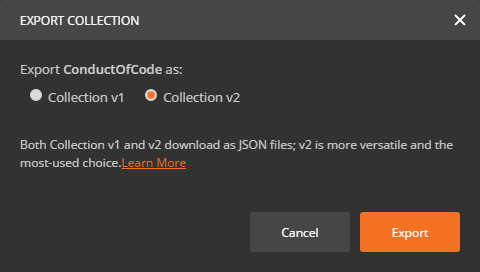
- Perfect for version control
The export file looks like this: ConductOfCode.postman_collection.json
Troubleshooting
If you are having problems with JavaScript in Postman, read Enabling Chrome Developer Tools inside Postman.